Showing posts with label crackers. Show all posts

Monday, October 31, 2011

Boo! Gluten Free Halloween Crackers

I've decided crackers are even more fun to make than cookies :)
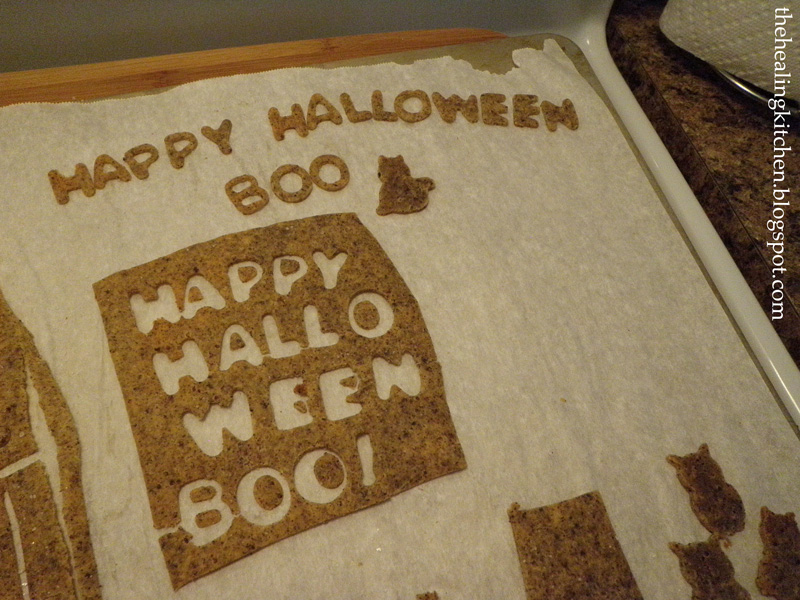
I used black quinoa in these crackers, hoping the crackers would be dark or black for a spooky Halloween look. That didn't happen, but you can see the black flecks in there:
Lesson learned: if you decide to make crackers that spell something (Happy Birthday? Merry Christmas? Happy New Year? Congratulations?) I recommend large cookie cutters. These were tiny and somewhat tedious to break out. Large cookie cutters are MUCH easier. These were fun, and cute, but I wouldn't do it again. Large letters. Trust me.

Here is what they look like before baking. I dug through my cookie cutters and also found cats and owls:

You bake the cookies just like that- slide the whole piece of parchment paper on the cookie tray and bake. Break out the crackers after they cool:
And the best part, you get to eat the scrap pieces from in between: 

Then surprise your little goblins:
Hope this gives you some fun gluten free ideas for future holidays/birthdays/parties. Simply use your favorite gluten free cracker recipe. There are a couple of gluten free cracker recipes on this blog, and you can Google for others. Crackers are SUPER easy to make!

Have a safe and Happy Halloween!

Monday, September 12, 2011

Gluten Free Savory Caraway Quinoa Crackers

These savory crackers get a protein boost from the nutty-flavored quinoa.
Gluten free, vegan, egg and dairy free, corn free, sugar free, nut free, soy free.
Gluten Free Caraway Quinoa Crackers
Makes 2 baking sheets of crackers (actual number of crackers depends on how you cut them)

Ingredients
1 1/2 cup of your favorite gluten free flour mix
1 tsp guar gum
1/2 tsp baking soda
1/4 tsp sea salt
3/4 cup cooked quinoa
5-6 Tbsp olive oil
1/3-1/2 cup water
Topping: Caraway seeds and coarse ground sea salt

Method
Preheat oven to 375F
Place the GF flour mix, guar gum, baking soda, and salt in the food processor. Process to combine.
Add quinoa, process to combine.
With processor running (I use the "dough" setting) add the olive oil, and then the water. Only add enough water for the dough to form a ball. Stop when you have a ball.
Divide the ball in half (it is easier to work in small batches).
Place one half of the dough ball on a piece of parchment paper. Lay another piece of parchment paper on top and roll flat, as thin as you can.
Remove top piece of parchment paper. Sprinkle dough with caraway seeds and sea salt, and put the parchment back on top. Gently roll, just enough to press the seeds into the dough.
Remove top piece of parchment, and use cookie cutters or knife to cut into desired shapes.
Slide entire sheet of parchment and dough onto baking sheet and bake at 375 for 12-15 minutes.
Let cool.
Repeat with second ball of dough.

Health benefits of quinoa, caraway, olive oil

I have an illustrated tutorial on the method in this post. I just wanted to post the ingredients for this recipe for my own reference because I keep forgetting to write down which one works. OK, now I am going to throw away my recipe page with notes scribbled all over it, and go with this one on the blog!

Thursday, September 1, 2011

Gluten Free, Yeast Free Pizza Crust

Necessity is the mother of invention -Unknown
Ah, pizza. I must admit, I never really cared for pizza even before I was gluten/soy/dairy/everything free. Some of my friends tease that I have a tomato phobia- which may be true. I cannot stand tomato sauce. Nope. Not at all. Not spaghetti, lasagna, pizza, or ketchup. And definitely not raw tomatoes ((shudder)). Pesto sauce, alfredo sauce, or just plain ol' olive oil and garlic- mmm, now we're talking.

So, I was never really a pizza fan. However, my new found love for pizza started when I discovered Pizza Fusion. If you have a Pizza Fusion where you live, it is definitely worth checking out! It is a chain that started in Florida and has franchised up the East coast. They have an eco-friendly business philosophy (very cool). They also offer gluten-free and/or vegan pizzas. And real ingredients. Nothing frozen or from a can. They have regular pizza too, so it's a great place to go with friends, and everyone can get what they need or like. (and they offer an option for olive oil or pesto instead of tomato sauce, yay!)

Pizza Fusion's gluten-free pizza crust is delicious. But their GF crust (gluten, corn and soy-free!) uses canola oil and, of course, yeast- and those two ingredients make me pretty sick. I still eat it every once in a while- if I'm out running errands and absolutely starving- or if I'm just TOO exhausted to make a darn thing at home- but as much as I love it at that very moment, I pay for that choice for a couple of days afterwards.

So, I decided to figure out my own pizza crust.

The biggest challenge in pizza crust is not the gluten, it's the yeast. Fortunately, pizza crust doesn't have to rise too much; it's almost like a flatbread. The recipe below is what I've currently come up with to mimic the Pizza Fusion thin, crispy crust. It uses seltzer water in place of yeast for bubbles and rise. I think it's pretty good. I tried making it with and without a rolled edge, and I like the flat edge better; it produces a thin cracker/flatbread style crust.

And- it is easier to make than a yeasted crust!

*This recipe submitted to Wellness Weekend

Gluten Free, Yeast Free Pizza Crust
Makes two, 11" pizza crusts
Ingredients
2 cups gluten free flour mix
2 tsp guar gum
2 tsp corn-free baking powder
1 tsp sea salt
1 tsp organic raw cane sugar (you could probably use agave, or omit)
3 Tbsp olive oil
2/3- 1 cup seltzer water

Method
Preheat oven to 400 degrees F
Combine dry ingredients in food processor fitted with the "S" blade.
With food processor running (I use the "dough" setting on mine), add the olive oil.
Slowly add the seltzer water until the dough becomes a ball. Stop processing when you get a ball.
Divide dough ball in half.
Place half of the dough ball on a non-stick work surface. I use a large, countertop SilPat for this. You can also flour your surface with a GF flour, but in my humble opinion, GF flour is too expensive to go spreading around on countertops ;)
Roll pizza dough into a large, flat circle.
Put dough on pizza pan or baking sheet, brush top with olive oil.
Bake at 400 degrees for 10 minutes.
Remove:
Add sauce, cheese, and toppings, and return to oven:
Bake for another 12 minutes:
this is the flat edge I liked better

My toppings (use what you like/tolerate): I brush the crust (again) with olive oil and garlic, then added shredded mozzarella. Important: Buy a brick of cheese and shred it yourself- not only is this less expensive than buying pre-shredded cheese, but allergy note: pre-shredded cheese is coated with starch (corn, potato, or tapioca) to prevent it from clumping together in the bag.

For a vegan option, you could use soy/Daiya/nut/seed cheese, or no cheese at all.

I like kalamata olives and organic red onion on top. I don't often eat dairy, but it is the least of my reactions (symptoms are merely annoying rather than debilitating), so every once in a while (say, 3 or 4 times a year) I will, for something like this (sometimes a girl just gets hungry, y'know?!?)
I learned it is very difficult to take a good photo of pizza : ) 
Note: Since this makes two pizzas, I am curious if it might work to freeze the 2nd pizza crust after baking for the first 10 minutes, to use later. I did freeze pizza slices after they were made, and that worked great. But I didn't try freezing the "naked" dough, before adding the cheese and toppings. If you try that, I'd love to hear how it turns out.

Another idea would be to make smaller crusts for individual-size pizzas, since those would be easier to store in the freezer. Then on pizza night, everyone could make pizzas with their own toppings (great for allergies AND personal preferences :)

Friday, June 3, 2011

Pesto Animal Crackers

I am ridiculously excited about the farm animal cookie cutters I received as a birthday gift. Take a look:
Why did I want farm animal cookie cutters, you ask? Why, to make gluten free, allergy-friendly animal crackers, of course!

Crackers are quickly becoming one of my favorite things to make. They are quick, easy, nearly impossible to mess up, and taste amazing. I don't think I've made two batches that have come out the same yet, but they have all been delicious. Who knew homemade crackers taste so much better than store-bought? Making your own is healthier, and a lot less expensive (especially if you are looking at gourmet or gluten-free crackers). Not to mention, you can make custom flavors, and of course, only use ingredients you tolerate. What's not to love?

This is the second batch of crackers I've made using leftover pesto. Mmmm. Delicious. I might have to start making pesto just to make crackers. I think pesto crackers are my favorite so far.

Pesto Animal Crackers (Gluten Free)

Ingredients
1.5 cups of your preferred gluten free flour mix (I used this recipe)
1 Tbsp organic sugar
3/4 tsp sea salt
3 Tbsp light olive oil (less if you use more pesto)
Approximately 1/4 cup leftover pesto (I used the pesto left over from this recipe)
5 Tbsp filtered water
*Note: I forgot this time, but next time I will add 1tsp guar gum to this recipe to help the crackers hold together a little better

Instructions
Add gluten free flour mix, sugar, sea salt, and baking powder to food processor fitted with the "S" blade.  Pulse a few times until mixed. 

Add the pesto and pulse again.

While the food processor is running (I use the "dough" setting on mine), add the olive oil through the chute at the top. Once the olive oil is mixed into the flour mixture, with the food processor still running, start adding the water, one tablespoon at a time, until the mixture starts forming a dough ball. The amount of water varies by each batch of cracker, and in this recipe it will also depend on how much pesto you have added. You are looking for a dough ball that sticks together and will hold together when you roll it out- but you don't want too much water because the dough will become impossibly sticky and difficult to roll out without sticking to everything.

You will end up with a ball of dough. Divide this ball in half. Put half back in the food processor with a towel over the top to prevent it from drying out. 

Use two sheets of parchment paper to roll out your dough. Place the first sheet on the counter and flatten the ball of dough on top of it. 

Lay the second piece of parchment paper on top of the flattened dough. Roll out the dough between the two sheets of parchment paper.
The secret to crispy crackers is to roll the dough very thin.
Peel away the top sheet of parchment paper (save it to roll out the second half of the dough) and get out your chosen cookie cutters. Or a pastry wheel. Or a pizza wheel. Or a knife. Or an empty tin can. Whatever you like. 

Did I mention how enamored I am with my new cookie cutters?
Start cutting your shapes.
Once you have cut your crackers, slide the entire sheet of parchment paper, with the cracker dough on top, onto a baking sheet.

Repeat with the second ball of dough.

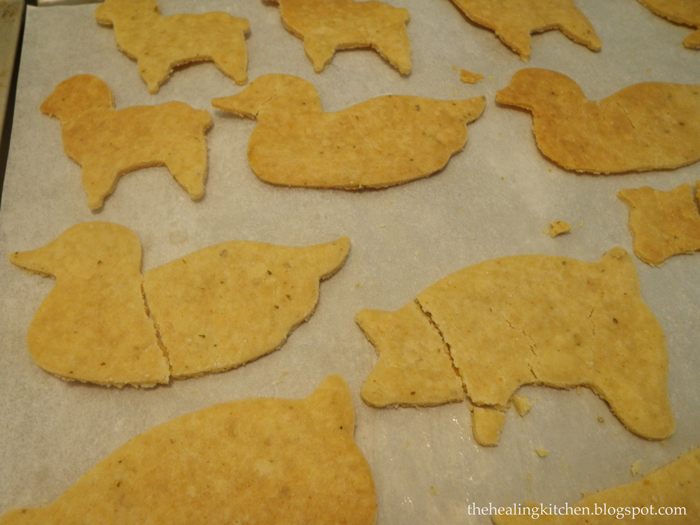
Bake at 400 degrees F for approximately 15 minutes. When they are done, they will look like this:
Closer view: 
Once they have cooled, you can break them out:
And eat the crumbs- you know, all those pieces from the middle. No one will know;)
We had a few injuries: 
Gluten-free... quackers?
And did I mention that making your own crackers is really cheep?
Cheep cheep cheep :)

p.s. you can get your own set of Farm Animal cookie cutters here (they have other animals too... so cute... don't be surprised if you see a future recipe for marine animal seaweed snacks, heehee)