Showing posts with label potato free. Show all posts

Tuesday, July 10, 2012

How to make your own vanilla extract

There seems to be some confusion out there regarding extracts, and whether they are gluten (or other allergen) free.  Commercial vanilla extract is made using alcohol and vanilla beans. Any type of alcohol will work (which is great news for those of you who plan to follow this recipe and make your own at home). Commercial extracts do not need to list the type of alcohol used- but it is pretty safe to assume that the alcohol is either derived from gluten-containing grains, or corn (it is possible the alcohol used might come from sugarcane, potatoes, or another starchy substance but you cannot tell from the label on the extract).

Does the type of alcohol, or more accurately, the ingredient from which it is derived, matter? I'm not sure. Shauna of Gluten Free Girl, whose writing I love and research and advice I trust, reports in this post that while it was once believed that alcohol derived from wheat, barley or rye contained gluten, it is now believed that the gluten proteins are destroyed in the distilling process. Therefore, grain based alcohols and extracts would be considered gluten-free. Some brands of extract are certified gluten-free; whether this is because the distilling process has denatured the gluten protein, or because they use an alcohol derived from a non-gluten containing grain, such as corn, I'm not certain. For those with corn allergies, Cornallergens.com lists vanilla extract as an ingredient to avoid.

In the past, I have gotten sick from recipes using commercial vanilla extract (the quality stuff, no fillers or imitation vanilla) and when I substituted vanilla powder instead of extract, I tolerated the dish just fine. That led me to believe the vanilla extract was the culprit. That's when I started using vanilla beans or vanilla powder in all of my baking and smoothies- which I now actually prefer, since I find that the real vanilla bean has an even better flavor than extract... mmmmm.

However, there are some recipes where you may want the vanilla flavor, but you do not want little black specks from the vanilla bean in the final product. What to do?

Good news! It is very easy to make your own vanilla extract. It is also much less expensive to make it yourself than to buy quality commercially prepared vanilla extract. It is also pretty cool to be able to adjust the flavor of your homemade extracts to your needs and liking, simply by varying the type of alcohol or the variety of vanilla bean. Tip: if you are really into vanilla, order a sampler variety packand try different types of beans- I did this a while back and it has been a lot of fun pairing certain varieties with certain recipes.
If (like me) you are wondering which alcohols are derived from which ingredients, a beverage industry site explains this about different types of alcohols (spirits):
Generally speaking, spirits are classified by the fermented material that they are distilled from. Whiskies, Vodka, Gin and most types of Schnapps are made by distilling a kind of beer made from grain. Brandy is made from fermented grape juice, and Fruit Brandy is made from other fruits. Rum and Cane Spirits derive from fermented sugar cane juice or molasses. Tequila and Mezcal come from the fermented pulp of the agave plant. Fortified wines are hybrid beverages in that they are a blend of fermented wine and distilled spirits (usually Brandy).
Note the above is just a general guideline and somewhere to start. If you plan to make your own extracts, and wish to avoid a certain ingredient, be sure to research the ingredients in the specific brand of alcohol you plan to purchase. When I went searching for vodka, believing all vodkas were made from potatoes, I found nearly all of the vodkas at the (very large) liquor store I went to were actually derived from corn. Thanks to the very helpful manager, we did locate a vodka derived from grapes, which was a fantastic surprise. Grapes are even better than potatoes for me!

 
So, after all of that... here is how you make extract:

Super Easy, Allergy Friendly Vanilla Extract

Ingredients
1-2 vanilla beans of choice
1 cup alcohol of choice
Glass container

Method
Place the vanilla beans in a glass container, and pour enough alcohol in the container to cover the beans.
You do not need to use whole beans, you can use the bean after you've scraped out the inside for another recipe. This is a great way to make those expensive vanilla beans go even further.

I used Indian vanilla beans, because that is what I had on hand. I'd had these for a while, and they were getting a little stiff and not so good for scraping out for baking, so I just broke 2 whole beans in half and put them in the jar.
Keep the mixture in a cool dark place, and every week or so, give the jar a little shake to mix things around. The extract is ready in about 4-6 weeks, but it will continue to get darker and stronger over time.

Here is a comparison with a batch I made a few months ago:
Ideally, you would use a dark glass jar to protect from light, but I just used the paper bag that the vodka came in.
That's it! I will soon be trying this recipe with mint and other flavors to make more extracts. I would love to hear your experience with this, especially if you have tried other flavors.

Enjoy!

Friday, January 20, 2012

Gluten Free Vegan Mini Pot Pie Casseroles

Hello everyone! I know, long time no post. I have so many things I want to post about... but today I want to share with you my first ever attempt at making a vegetable pot pie. Ever. I've never made pot pie before... not gluten free, vegan, or any other way (unless frozen dinners count?)

This recipe was a series of experiments. The whole reason I made a pot pie was because I wanted to try a gluten free pie crust that works for my specific food allergies. One day I may get around to writing a separate post about the pie crust, but that is a story for another day :)

I've never made a gluten-free pie crust before. So that was challenge #1.

I've also never made a pot pie before. That was challenge #2.

Since I've never made a pot pie, I didn't really know what goes into a traditional pot pie- but after reading oodles of recipes, I learned that it typically includes butter, and a lot of cream. I wanted a dairy-free pot pie filling, so that was challenge #3.
I'm happy to report that after lots of reading, planning, chopping, cooking & experimenting, the result was a successful gluten-free, allergy-friendly recipe that included NO dairy, corn, or soy. It tastes great, contains TONS of veggies, and without the high fat dairy and cream, I think it is healthier than the "traditional" version.

I chose to make four mini-pies instead of one large pie, because I planned to freeze individual portions for reheating later. But you could certainly make this dish as one large casserole. Note: the pie crust in the photos IS gluten free, but was NOT vegan. The rest of the pot pie is vegan. To make the entire recipe vegan, simply use a vegan shortening in the pie crust.

This recipe is linked to Cybele Pascal's Allergy Friendly Friday <-- follow the link for more allergy-friendly recipes and ideas.

OK, here is the step-by-step:

Gluten Free Vegan Mini Pot Pies (no gluten, dairy, soy, egg, corn or potato)
Makes 4-5 mini casseroles, or one large casserole
Prep time: 30 minutes
Bake time: 50 minutes
Ingredients
1 tablespoon olive oil
1 medium head of fennel, finely chopped (about 1 1/2 cups)
2 stalks celery, chopped (about 1 cup)
2 cups baby onions, blanched and peeled
3-4 medium carrots, peeled and chopped (about 1 1/2 cups)
Baby Bella mushrooms, chopped (about 1/2 cup)
Sea salt and black pepper to season
1/4 cup gluten free flour mix
1 cup allergy-friendly vegetable broth
1 cup rice milk
1 cup frozen baby green peas
1/4 cup thinly sliced fresh chives
1/4 cup fresh parsley
1 tablespoon apple cider vinegar
Gluten free pie crust (use your favorite, or recipe below)
Approximately 1/3 cup rice milk plus 1 teaspoon agave- to brush the tops of the crusts for browning
Flaked sea salt and cracked black pepper- for tops of crusts
Method
Prep: Blanch and peel the baby onions.
Chop all of the veggies. Chop. Chop. Chop. It is a lot of veggies :)

Heat the oven to 375 degrees F and put rack in the middle.

Heat olive oil over medium heat in large pan (I used a large cast iron pan). When it is hot, add fennel, celery, onions, and carrots, and cook until softened, and onions are translucent, about 2-4 minutes.

Add mushrooms, season well with sea salt and freshly ground pepper, and stir to coat. Cook, stirring rarely, until mushrooms have let off water and are shrunken, about 5-7 minutes.
Sprinkle flour over vegetables, stir to coat, and cook about 1-2 minutes. Carefully add vegetable broth and rice milk, stirring constantly until mixture is smooth. Bring to a simmer over medium heat, and cook until slightly thickened, about 5 minutes.
Remove from heat, add peas, fresh herbs, and vinegar, and stir to coat. Season well with sea salt and fresh ground pepper (yes, season again. I know it seems like a lot of salt and pepper, but trust me, it is ok).

Ladle filling into mini-casseroles (or one large casserole).
Can I digress for just a moment to show you these adorable mini casserole dishes...???
Too cute, right??? I love the idea that once you get to the bottom, SURPRISE, you get a cheerful message : )

OK, roll out pie dough and trim to fit the top of your casserole (I just used the lid as a guide):
Place dough over the top of the dish. Tip: brush the top sides of dish (where the crust will hang over) with olive oil to prevent the dough from sticking.
Brush tops with rice milk/agave mixture. Sprinkle with flaked sea salt and fresh ground pepper, and cut slits in the top to vent.

Place mini-pies on baking sheet, and bake in center of oven at 375 degrees F for 45-50 minutes, or until top is golden brown and filling is bubbling hot. These are about halfway done (I was really impatient and kept checking to see if they were going to turn out ok :)
And finally... Ta-da!
Yummmmmmm!

Easy Gluten Free Pie Crust
Makes one 9 inch pie crust
This pie crust can be made up to 3 days in advance and kept in the refrigerator until ready to use

Ingredients
1/2 cup non-dairy, non-soy shortening (such as Spectrum Organic Shortening)
2-4 tablespoons cold water
5 oz (about 1 1/4 cups) gluten free flour mix
1 teaspoon fine sea salt
1 tablespoon sugar
1 teaspoon guar gum

Method
Cut shortening into 1/2 inch pieces and place it in the freezer for 15-30 minutes.

Chill some water with ice cubes while preparing the dry ingredients.

Combine the flour, salt, sugar, and guar gum in bowl of food processor and mix until combined.

Add the shortening and pulse 6-10 times, or until the mixture resembles a coarse meal with some pea size pieces of flour-covered shortening. Do not over mix!!!

With processor running (I use the "dough" setting, with the "S" blade), add ice water 1 tablespoon at a time until the mixture just barely starts to clump together. You want just enough water so that when you pinch the dough, it holds together. Do not add more water than necessary. Do not over process.

Remove the dough from the food processor and shape into a disc. Wrap in plastic wrap and refrigerate at least one hour, or up to 3 days.

When ready to roll the dough, place a piece of parchment paper on the counter, and sprinkle with gluten free flour. Place dough on parchment, and sprinkle the top of the dough with flour before rolling. Roll dough to desired size and shape (a cool rolling pin helps, I actually stick mine in the freezer first). Tip: if you are making several small pie crusts, divide the dough, and roll out one section at a time, keeping remaining sections in the refrigerator until you need them.

Lift the entire piece of parchment from the counter, flip and carefully center dough over the casserole, lay dough on top of filling/dish, and carefully peel away parchment paper. Voila!

Friday, November 25, 2011

Raw Vegan Thanksgiving: Recipes and Photos

Gluten-free? Grain-free? Dairy-free? And trying to navigate holidays???? Don't worry, you can absolutely do it. The menu below is completely free from corn, soy, dairy, eggs, pumpkin/squash family, gluten, grains, refined sugar, processed foods, additives or preservatives. Hopefully it may give you some ideas in planning your holidays.

My neighbor and I decided to experiment and see whether we could create an entirely RAW Thanksgiving with traditional-type dishes. I'm thrilled to report it was a huge success! The dishes came out smelling great, looking great, and tasting great. Just like the traditional version- we were STUFFED afterwards (no pun intended). Somehow, we still managed to eat cheesecake after an after-dinner walk with Bailey on the beach.

The best thing... none of the guilt, nor that "GROAN-why-did-I-eat-that" feeling from eating too many inflammatory foods.
100% Raw Vegan Turkey- No tofu here!

Raw Turkeyless Turkey
Equipment: Food processor, dehydrator
Prep time: Soak nuts overnight. Dehydrate turkey 12-14 hours.
Serves: 5-6

Ingredients
5 ounces walnuts (about 2 cups)
5 ounces almonds (about 2 cups)
1 pound carrot pulp
1 medium onion, diced small
1 Tablespoon raisins, soaked just long enough to make them soft (while you are getting your other ingredients together should be enough time)
1 Tablespoon good olive oil
1 Tablespoon caraway seeds, ground
1 Tablespoon Italian seasoning (I didn't have Italian seasoning, so I used Costco/Kirkland brand Organic 20 Spice No Salt Seasoning)
Sea salt to taste

Method
Soak nuts 6-8 hours or overnight. Drain nuts and rinse well.
Combine all ingredients in food processor until you have a pate. It should be firm, not soggy, and hold together when you press it together. 
Shape your "turkey" into whatever shape you like. Many people make a loaf. I am goofy about making food look festive, so I shaped a turkey body, then separately shaped two drumsticks and two wings. After they were dehydrated, I assembled the "turkey" on the platter. 

Tip: if you are Googling recipe ideas the night before Thanksgiving (not that I have ever done that, hahaha) and do not have 12-16 hours to dehydrate, you could simply shape a loaf, slice it, and dehydrate the slices. Or you could shape lots of wings and drumsticks to dehydrate. Any small shape will dehydrate more quickly than the big solid turkey.

You could also eat this not dehydrated, and it is still safe and tasty. However, dehydrating this recipe really makes a big difference in texture, flavor, and color. It als makes the turkey warm, and holds together better. I highly recommend dehydrating this recipe- but I tell you all of that just to point out that if all you do is get it in the dehydrator for a couple of hours, you'll be fine. It's just for taste and texture- it's not like undercooking a real turkey :)

Raw Walnut and Mushroom Stuffing 
Serves: 5-6
Equipment: Food processor Optional: Dehydrator
Prep time: Marinate mushrooms 2-4 hours or overnight
 Raw Vegan Stuffing in Turkey :)
Ingredients
¼ cup olive oil
¼ cup Bragg's Liquid Aminos (Or substitute: Allergy-safe vegetable broth plus sea salt)
1 Tbsp apple cider vinegar
2 portabello mushrooms, chopped
3 cups walnuts
1 tsp salt
2 tsp chopped fresh thyme
1 ½ Tbsps fresh rosemary, chopped finely
2 Tbsps chopped fresh parsley
1 tsp chopped fresh sage
3 Tbsps olive oil
1 ½ cups grated carrot
1 cup chopped celery
½ cup pecan pieces
½ cup raisins

Method
Combine olive oil, Bragg's (or broth), and apple cider vinegar. Marinate the chopped portobellos in this mixture overnight.
Pulse walnuts, salt, thyme, rosemary, parsley and sage in food processor. Once roughly combined, add olive oil. Pulse until combined and the texture you like. We chose a chunkier texture that resembled traditional dressing.
Stir in carrot, celery, pecans and raisins.
Optional: put stuffing in dehydrator for 30-60 minutes to warm before serving.
Raw vegan (Gluten-free, Grain free, Dairy free) dressing right out of dehydrator

Raw Vegan Mushroom Gravy
Equipment: Blender Optional: Dehydrator or High-speed blender
Prep time: Soak nuts 4-6 hours

Ingredients
¼ cup warm water
¼ cup brazil nuts, ideally soaked for 6 hours, rinsed and drained
1 shallot or 1 clove garlic
2 teaspoons dried mushrooms, ground to a powder
¼ teaspoon salt
Pinch of pepper
½ Tbsp olive oil

Method
Blend all ingredients until smooth. 
Optional: Place in dehydrator 30 minutes before serving to warm. Alternatively, if you are using a VitaMix, you can simply blend until warm.

Note: We didn't care for this recipe. The original recipe called for 1/4 cup olive oil, and the final result tasted like olive oil. I have reduced the oil here to 1/2 Tbsp. I think this would help, but have not tried it. If you try it, post here and let me know! I'd suggest adding the olive oil slowly and taste as you go.

Raw Vegan Green Bean Casserole
Serves: 5-6
Equipment: Blender Optional: Food processor, Dehydrator.
Prep time: 3-24 hours to soften green beans

Casserole ingredients:
Fresh green beans
¼ cup red onion, sliced very thin
½ cup chopped mushrooms (any kind you like)

Cream of mushroom soup ingredients:
½ cup pine nuts
¼ cup white button mushrooms, chopped fine
½ teaspoon garlic
½ teaspoon salt
1 dash black pepper
1 cup filtered water
Top with caramelized shallots (recipe below)

Method
Thinly slice green beans with knife, or shred in food processor. To soften green beans, freeze them for 24 hours, and then let thaw. Alternatively, you can dehydrate for a few hours (I have not tried this, if you try it, let me know how it works).
Blend soup ingredients: pine nuts, mushrooms, garlic, salt and pepper (this is SO good!)
Pour soup mixture over sliced green beans, red onion, and chopped mushrooms.
Optional: Warm in dehydrator before serving.
Top with caramelized shallots (recipe below)

Note: I have made a few things with raw green beans, and I've decided raw green beans taste a bit "green" for my liking. But this and similar raw recipes get rave reviews online, and Joan liked it a lot. 

I'm thinking... if you didn't care about the recipe being "raw", you might be able to gently steam the sliced green beans, then combine with the soup and shallots. I may try that next time.

I LOVED the cream of mushroom soup, and would definitely make the soup on its own for lunch.

Raw Caramelized Shallots
Equipment: Dehydrator
Time: Deydrate 2-4 hours
Ingredients
3 large shallots, sliced very thin
3 Tbsp maple syrup
1½ teaspoons olive oil
Sea salt to taste

Method
Combine ingredients. Spread out on dehydrator tray lined with Teflexx sheet or parchment paper. Dehydrate until crispy, approximately 2-4 hours.
Yummy! I am wondering what else I can top with these in the future :)
Fresh Cranberry Chutney
Equipment: Food processor / blender
Time: Blend

I don't have Joan's top secret super-duper cranberry chutney recipe pictured above, but here is a cranberry recipe that came with my VitaMix that I think is very good.

Ingredients
1 orange, peeled, halved
1 cup fresh or frozen cranberries
1 apple, cut in quarters
1/4 cup sugar or other sweetener 
1/3 cup walnuts or pecans

Method
Place all ingredients in Vitamix and secure lid.
Blend, starting with level 1, slowly increase to level 4.
Blend about 10-15 seconds, or until chunky.

Oh, I almost forgot, I also made Cafe Gratitude's Pumpernickel-Rye toast:
We didn't even eat this, or the olives, we were so full from everything else!

Some more holiday photos:
 Place Settings
 Fall Flowers (Thanks, Ed)
 Acorn Salt & Pepper Shakers
Raw Vegan Thanksgiving Table

I'll post dessert (Raw Vegan Cranberry-Apple Cheesecake) in a separate post. Yum yum yum.

I'd love to hear what you made, and any suggestions for next year.

Soooo... does anyone have suggestions for Christmas dinner??? 

Monday, October 31, 2011

Boo! Gluten Free Halloween Crackers

I've decided crackers are even more fun to make than cookies :)
I used black quinoa in these crackers, hoping the crackers would be dark or black for a spooky Halloween look. That didn't happen, but you can see the black flecks in there:
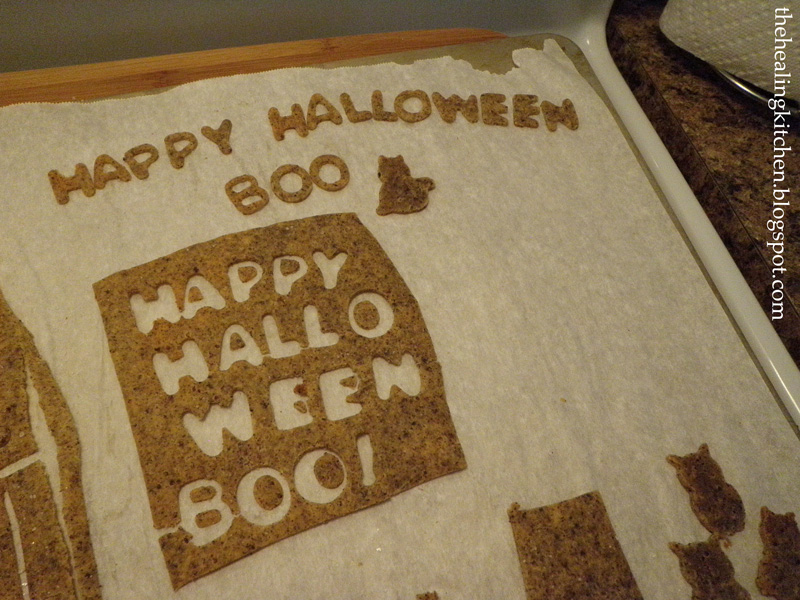
Lesson learned: if you decide to make crackers that spell something (Happy Birthday? Merry Christmas? Happy New Year? Congratulations?) I recommend large cookie cutters. These were tiny and somewhat tedious to break out. Large cookie cutters are MUCH easier. These were fun, and cute, but I wouldn't do it again. Large letters. Trust me.

Here is what they look like before baking. I dug through my cookie cutters and also found cats and owls:

You bake the cookies just like that- slide the whole piece of parchment paper on the cookie tray and bake. Break out the crackers after they cool:
And the best part, you get to eat the scrap pieces from in between: 

Then surprise your little goblins:
Hope this gives you some fun gluten free ideas for future holidays/birthdays/parties. Simply use your favorite gluten free cracker recipe. There are a couple of gluten free cracker recipes on this blog, and you can Google for others. Crackers are SUPER easy to make!

Have a safe and Happy Halloween!