Showing posts with label nightshade free. Show all posts

Tuesday, November 26, 2013

DIY Gluten Free Flour Mix- 3 Options

Would you like to hear an amusing story?

As you may have surmised from the lack of recipe posts on The Healing Kitchen lately, I have not been cooking or baking much these days. Well, I decided enough was enough, and I am ready to get back in the kitchen.

I decided to make one of my staples: gluten free waffles. Yummy and easy! Well, easy if you have enough gluten free flour mix handy. Which I did not. No worries, I thought, I will just mix up a new batch. All I need is tapioca flour (check), mung bean starch (check), and the easiest of all, brown rice flour. Hmmm... No brown rice flour. That seems odd. I was sure I had some Bob's Red Mill flour around here somewhere…

Alas, I could not find it, so I hopped on Amazon, went to my "auto-ship" section, and clicked "send new shipment now". Voila! Two days later, I had a 4-pack of brown rice flour.

Fast forward a few more days, and we are back to the task at hand: making a batch of gluten-free flour mix. As I was moving some mason jars around in the cupboard, guess what I found? Brown rice flour. I had some after all.

OK, so I have two more bags of flour, no problem. I'll just make more flour mix. After all, it is getting to be the holiday season, I can use this as an excuse to make more baked treats. This may actually be a good "problem" to have.

As I'm calculating how much I will need of each ingredient, and what I might make with all of this flour, guess what shows up on my doorstep? Another 4-pack of brown rice flour. Yes. Apparently when I checked "send new shipment now", I neglected to notice when the next auto-shipment was scheduled…. which was, well, about a week later.

Now I have brown rice flour coming out of my ears. 10 bags! Egad! So I decided to turn this into an experiment, using some other ingredients I had on hand. And that is how I came to make THREE batches of gluten-free flour mix. They all use the same ratio as my go-to recipe, but I varied the type of starch in each one.
3 Versions of Homemade Gluten Free Flour Mix
The recipe for this basic gluten free flour mix is based on the one in Cybele Pascal's Allergen-Free Baker's Handbook. You can find her recipe for basic gluten-free flour mix on her website- I could not find a link directly to her recipe on her site, but if you click on any of her baked recipes, she usually posts the recipe for the flour mix with each one. Whole Living also lists Cybele's recipe for basic gluten-free flour mix here.

I love this flour mix- it measures 1:1 for regular flour in any recipe. For various reasons, I avoid potato starch, which is what Cybele uses, so I came up with a recipe that uses mung bean starch instead of potato. I previously posted that recipe here.

The recipe for the flours above are as follows:

Basic Gluten Free Flour Mix (variations)

Ingredients
18 ounces brown rice flour
2.5 ounces tapioca starch (sometimes called tapioca flour)
6 ounces EITHER mung bean starch OR arrowroot starch OR acorn starch

Process
Mix all ingredients together in a large mixing bowl. You can also use a food processor. Store in an airtight container and use 1:1 when a recipe calls for flour. Makes about 6 cups.

Where to find the ingredients
I find mung bean starch and acorn starch in Asian grocery stores. You can find arrowroot starch in most health food stores.

As I've mentioned, the mung bean version is fantastic, I have been using that mixture for years in any recipe that calls for flour. I just tested the acorn starch version in a cracker recipe, and it performed just fine. The crackers look dark because the acorn starch is dark to begin with (as you can see in the photo above)- but I did not notice any difference in taste. I will have to use it in a few more recipes and then let you know what I think. I have not used the arrowroot version yet, but perhaps I will try that in my next batch of waffles.

And for you overachievers out there, here are some links to more information about: brown rice, cassava (aka tapioca, manioc, yucca, or yuca), mung beanacorn starch and another interesting article about acorns.

Monday, July 2, 2012

Red White & Blue Rice Krispy Treats

Here is a fun, healthy, patriotic treat that only takes about 5 minutes to make. Enjoy!
Allergy Friendly Red White and Blue Rice Krispy treats
Gluten free and vegan. No corn, soy, or dairy.

Ingredients
1/3 cup brown rice syrup
1/3 cup nut butter of choice
1/4 teaspoon vanilla powder OR 1/2 tsp vanilla extract
3 cups puffed rice cereal
1/3 cup dried blueberries
1/3 cup dried cranberries

Method
In a large pot, heat brown rice syrup, nut butter, and vanilla over med-low heat until melted.
Stir in puffed rice, cranberries, and blueberries
Spread evenly in a 9x9 or similar pan, and let cool.
Cut into squares and enjoy!

Great for snacks or breakfast.

You can use any puffed rice cereal that works for you, just double check to make sure it meets your allergy needs. I use Arrowhead Mills brand, it looks like this:


Note that this kind of puffed rice is not as crisp as a Rice Krispy type cereal. For that texture, I have used Erewhon brand, it looks like this: 


Brown rice syrup comes in a jar in the sweetener/baking aisle and looks like this:


Also note that you can find a variety of puffed grains, such as millet, quinoa, and corn in the cereal aisle. Play around, and mix and match various grains for your taste or allergy preferences. For example, here is a link to puffed millet treats I made for Halloween.

Have fun! Happy 4th of July.

Health benefits of: Blueberries, Cranberries

Saturday, February 18, 2012

Homemade Vegetable Bouillon

My first batch of Homemade Bouillon

Vegetable broth is one of those ingredients that has stumped me for a while. I never realized how many recipes call for vegetable (or chicken) broth. I searched for about a year, but no matter which brand I looked at, there was always something in the ingredients that I was sensitive to.

But I also noticed something else. Even if I didn't have food sensitivities.... there are some products that I don't think I'd want to consume.

For example, take a look at the ingredients in a major brand of bouillon:

Ingredients: with Other Natural Flavors Ingredients: Salt, Sugar, Flavor (Hydrolyzed Soy Protein, Salt), Hydrolyzed Soy Protein, Contains 2% or less of Silicon Dioxide (Anticaking Agent), Fat Flavor (Partially Hydrogenated Corn Oil, Flavoring), Natural Flavor (Autolyzed Yeast Extract, Salt, Sugar, Whey Powder [from Milk], Lactic Acid), Spice, Onion Powder, Dehydrated Cooked Beef, Caramel Color, Dried Beef Stock, Disodium Inosinate and Disodium Guanylate, Autolyzed Yeast, Flavoring. No MSG Added (Contains Naturally Occurring Glutamates).

Food allergies and sensitivities aside... yuck! That is not even food- those are laboratory ingredients designed to taste like food.

In contrast, here are the ingredients in a top organic brand:

Ingredients
Vegetables* and Concentrated Vegetables* (Carrots*, Celery*, Onion*, Tomato*), Salt, Soy Sauce* (Water, Soybean*, Salt, Alcohol*), Cane Sugar*, Maltodextrin*, Natural Flavor, Potato Starch*, Autolyzed Yeast Extract, Dried Onion*, Dried Garlic*, and Spice*. *Certified Organic by QAI

At least it is real food : ) But- as those of you with gluten or other sensitivities know- these ingredients still present an allergy/health issue- "natural flavor" could be anything. The catch-all "natural flavor" is so frustrating. It could be derived from corn, or soy, or wheat-- you simply do not know.

Even if the "natural flavor" turned out to be safe for me, I avoid corn, soy, potato, and yeast, due to allergies and sensitivities. So, even the organic brand does not work for me.

Of course, there are other brands, but I've found that they all contain very similar ingredients. Same goes for broth that comes in a box or can. In recipes, I would just use water instead of broth, but there was definitely flavor lacking in the final product.

One day, I came across this recipe for DIY Bouillon on 101 Cookbooks. This recipe is so easy, much healthier than store-bought, is made entirely from whole food (organic, if you choose) ingredients, and you can customize ingredients to your own needs or preferences.

I made a batch a while back, and it lasted forever. I used it in everything- in every recipe that called for broth (finally!), as extra flavor when making soup, in the rice cooker when making rice or quinoa, basically anything that could use some seasoning. I just love it. It is now a staple in my kitchen.

This time, I made half a batch, and adjusted the ingredients based on seasonal availability, and the fact that I am now tolerating more foods (yay!) I am posting with the ingredients I used, but click on the link above for the full/original version on 101 Cookbooks.

Homemade Vegetable Bouillon (Gluten free, Yeast free, Nightshade free, Vegan)
Equipment needed: Food processor
Makes about 1 1/2 cups (one quart, and one pint mason jar)

Ingredients
2 1/2 ounces leeks, slice into rings and wash well
3 1/2 ounces fennel bulb, roughly chopped
4 ounces carrot, scrubbed and roughly chopped
1 stalk celery
1 3/4 ounces shallots
2 small-ish garlic cloves
4.5 ounces fine grain sea salt
3/4 ounce parsley
1 ounce cilantro


Method
Add vegetables to food processor, and pulse a few times to mix. Scrape down sides of food processor, if necessary. Add remaining ingredients, and process until well combined. You will wind up with a loose paste.
Spoon into jars, and keep in freezer until needed. Because of all the salt, it barely solidifies, so it is easy to scoop out when you need it.

As the original recipe suggests, I typically use about 1 tsp of this bouillon per 1 cup liquid; although sometimes I use a little more. It is totally up to you- feel free to adjust amounts (and ingredients) to your preference.

This recipe is linked to Made From Scratch Mondays on Living With Food Allergies and Celiac Disease. Be sure to check their page for more gluten free recipe ideas.

Monday, February 13, 2012

Pomegranate Lentil Soup

Brrrrr! Cold outside = make soup!
Here is a recipe I originally found on theKitchn. It is warm, tasty, full of iron, protein, & fiber. I used spinach instead of chard, only because that's what I had on hand. I didn't put the pretty pomegranate arils on top, either, because I didn't have any. But I think that punch of red would be very pretty on top of the soup. Especially in the heart shaped bowl :)

This recipe contains no gluten, corn, dairy, soy, or nightshades.

Pomegranate Lentil Soup 
Serves 6

Ingredients
2 tablespoons olive oil
1 1/2 cups diced onion
1/2 cup diced carrot
1 teaspoon ground cumin
1 teaspoon ground coriander
1 1/2 cups brown lentils, picked over and rinsed
1 1/2 cups finely chopped chard (I used fresh spinach, but any dark leafy green would work)
6 cups water
1/2 teaspoon salt
Salt and freshly ground black pepper to taste
1 1/2 cups pomegranate juice* (I've found Costco has the best price on pomegranate juice, but Target is a close second, especially when on sale)
1 large pomegranate, de-seeded (I've noticed in the produce section of some groceries, you can now buy a small container of pomegranate arils already out of the pomegranate)
*If making it from scratch, you will need about 3-4 pomegranates to make 1 1/2 cups of juice.

Method
Heat olive oil in a large pot over medium heat. Add onion and carrot and sauté until onion is translucent.
Add cumin and coriander and sauté for another minute.
Add lentils, chard, water, and 1/2 teaspoon salt and stir to combine. Bring to a boil. Reduce heat and simmer until lentils are tender, about 30 minutes.
Stir in pomegranate juice and simmer for another 5 minutes.
Season to taste with salt and pepper.
To serve, ladle soup into bowls and sprinkle with pomegranate seeds.

Click here to see nutritional information and health benefits of: Lentils, Pomegranate, more on Pomegranate, Chard, Spinach, and other Green Leafy vegetables

This recipe is linked to Made From Scratch Mondays on Allergies and Celiac- check it out for more gluten free and allergy-friendly recipes.

Friday, January 20, 2012

Gluten Free Vegan Mini Pot Pie Casseroles

Hello everyone! I know, long time no post. I have so many things I want to post about... but today I want to share with you my first ever attempt at making a vegetable pot pie. Ever. I've never made pot pie before... not gluten free, vegan, or any other way (unless frozen dinners count?)

This recipe was a series of experiments. The whole reason I made a pot pie was because I wanted to try a gluten free pie crust that works for my specific food allergies. One day I may get around to writing a separate post about the pie crust, but that is a story for another day :)

I've never made a gluten-free pie crust before. So that was challenge #1.

I've also never made a pot pie before. That was challenge #2.

Since I've never made a pot pie, I didn't really know what goes into a traditional pot pie- but after reading oodles of recipes, I learned that it typically includes butter, and a lot of cream. I wanted a dairy-free pot pie filling, so that was challenge #3.
I'm happy to report that after lots of reading, planning, chopping, cooking & experimenting, the result was a successful gluten-free, allergy-friendly recipe that included NO dairy, corn, or soy. It tastes great, contains TONS of veggies, and without the high fat dairy and cream, I think it is healthier than the "traditional" version.

I chose to make four mini-pies instead of one large pie, because I planned to freeze individual portions for reheating later. But you could certainly make this dish as one large casserole. Note: the pie crust in the photos IS gluten free, but was NOT vegan. The rest of the pot pie is vegan. To make the entire recipe vegan, simply use a vegan shortening in the pie crust.

This recipe is linked to Cybele Pascal's Allergy Friendly Friday <-- follow the link for more allergy-friendly recipes and ideas.

OK, here is the step-by-step:

Gluten Free Vegan Mini Pot Pies (no gluten, dairy, soy, egg, corn or potato)
Makes 4-5 mini casseroles, or one large casserole
Prep time: 30 minutes
Bake time: 50 minutes
Ingredients
1 tablespoon olive oil
1 medium head of fennel, finely chopped (about 1 1/2 cups)
2 stalks celery, chopped (about 1 cup)
2 cups baby onions, blanched and peeled
3-4 medium carrots, peeled and chopped (about 1 1/2 cups)
Baby Bella mushrooms, chopped (about 1/2 cup)
Sea salt and black pepper to season
1/4 cup gluten free flour mix
1 cup allergy-friendly vegetable broth
1 cup rice milk
1 cup frozen baby green peas
1/4 cup thinly sliced fresh chives
1/4 cup fresh parsley
1 tablespoon apple cider vinegar
Gluten free pie crust (use your favorite, or recipe below)
Approximately 1/3 cup rice milk plus 1 teaspoon agave- to brush the tops of the crusts for browning
Flaked sea salt and cracked black pepper- for tops of crusts
Method
Prep: Blanch and peel the baby onions.
Chop all of the veggies. Chop. Chop. Chop. It is a lot of veggies :)

Heat the oven to 375 degrees F and put rack in the middle.

Heat olive oil over medium heat in large pan (I used a large cast iron pan). When it is hot, add fennel, celery, onions, and carrots, and cook until softened, and onions are translucent, about 2-4 minutes.

Add mushrooms, season well with sea salt and freshly ground pepper, and stir to coat. Cook, stirring rarely, until mushrooms have let off water and are shrunken, about 5-7 minutes.
Sprinkle flour over vegetables, stir to coat, and cook about 1-2 minutes. Carefully add vegetable broth and rice milk, stirring constantly until mixture is smooth. Bring to a simmer over medium heat, and cook until slightly thickened, about 5 minutes.
Remove from heat, add peas, fresh herbs, and vinegar, and stir to coat. Season well with sea salt and fresh ground pepper (yes, season again. I know it seems like a lot of salt and pepper, but trust me, it is ok).

Ladle filling into mini-casseroles (or one large casserole).
Can I digress for just a moment to show you these adorable mini casserole dishes...???
Too cute, right??? I love the idea that once you get to the bottom, SURPRISE, you get a cheerful message : )

OK, roll out pie dough and trim to fit the top of your casserole (I just used the lid as a guide):
Place dough over the top of the dish. Tip: brush the top sides of dish (where the crust will hang over) with olive oil to prevent the dough from sticking.
Brush tops with rice milk/agave mixture. Sprinkle with flaked sea salt and fresh ground pepper, and cut slits in the top to vent.

Place mini-pies on baking sheet, and bake in center of oven at 375 degrees F for 45-50 minutes, or until top is golden brown and filling is bubbling hot. These are about halfway done (I was really impatient and kept checking to see if they were going to turn out ok :)
And finally... Ta-da!
Yummmmmmm!

Easy Gluten Free Pie Crust
Makes one 9 inch pie crust
This pie crust can be made up to 3 days in advance and kept in the refrigerator until ready to use

Ingredients
1/2 cup non-dairy, non-soy shortening (such as Spectrum Organic Shortening)
2-4 tablespoons cold water
5 oz (about 1 1/4 cups) gluten free flour mix
1 teaspoon fine sea salt
1 tablespoon sugar
1 teaspoon guar gum

Method
Cut shortening into 1/2 inch pieces and place it in the freezer for 15-30 minutes.

Chill some water with ice cubes while preparing the dry ingredients.

Combine the flour, salt, sugar, and guar gum in bowl of food processor and mix until combined.

Add the shortening and pulse 6-10 times, or until the mixture resembles a coarse meal with some pea size pieces of flour-covered shortening. Do not over mix!!!

With processor running (I use the "dough" setting, with the "S" blade), add ice water 1 tablespoon at a time until the mixture just barely starts to clump together. You want just enough water so that when you pinch the dough, it holds together. Do not add more water than necessary. Do not over process.

Remove the dough from the food processor and shape into a disc. Wrap in plastic wrap and refrigerate at least one hour, or up to 3 days.

When ready to roll the dough, place a piece of parchment paper on the counter, and sprinkle with gluten free flour. Place dough on parchment, and sprinkle the top of the dough with flour before rolling. Roll dough to desired size and shape (a cool rolling pin helps, I actually stick mine in the freezer first). Tip: if you are making several small pie crusts, divide the dough, and roll out one section at a time, keeping remaining sections in the refrigerator until you need them.

Lift the entire piece of parchment from the counter, flip and carefully center dough over the casserole, lay dough on top of filling/dish, and carefully peel away parchment paper. Voila!

Friday, December 2, 2011

Raw Vegan Cranberry Apple Cheesecake

Our Thanksgiving dessert was delicious:
I started with a recipe I found online. That recipe didn't turn out the way I'd hoped, but I was able to rescue it by making some adjustments.

I made too many changes in the middle of creating this cheesecake to feel comfortable posting a recipe yet, since I would only be guessing what I added and in what amounts. 

I can tell you the basics:
Crust: Almonds and dates
Filling: Cheesecake with just a hint of cinnamon, nutmeg, & cloves
Topping: Cinnamon, apples, cranberries, almond crumble 

Yum! 

Just writing about it makes me want to go eat one of the slices still in the freezer.

I don't have step-by-step photos of the dessert-making process, but I'll describe it, and post photos of the finished product. Warning: you may be hungry by the end of this post ; )

The week before, I dehydrated the (organic) cranberries: 
Aren't they beautiful? It was super easy, too. Just note: cranberry juice stains EVERYTHING it touches. Such as your cutting board, the dehydrator tray, a ceramic knife, your clothes if you are not wearing an apron... 

The cheesecake crust is simply almonds and dates processed in the food processor until crumbly. Reserve about 1/3 cup of the crust mixture for the topping, then press the remaining crust mixture into a 9" springform pan 
The filling is super simple. Most raw cheesecake recipes start with soaked cashews as a base. I followed the recipe I'd found online, but I was not happy with the taste or texture. A note here: a Vitamix really does make a huge difference. The original recipe suggested processing in a food processor, and I tried that. The mixture just does not get smooth enough. No matter how long I processed, it still had little pieces of cashew in it. Not good.

So, I put the mixture in the Vitamix, added a little filtered water, gave it a 20-second whirl, and it turned out perfectly smooth and creamy, as a cheesecake filling should be! Mmmm.
The taste was still not right, however. So I added some ingredients, added some more cashews, and played around with the flavor until it resembled a fall-spiced cheesecake. Yum!

Next step: pour the cheesecake batter into the springform pan, tap to remove any air bubbles, cover, and put in the freezer to firm up.

While the cheesecake was chilling, I peeled and cored 3 Honeycrisp apples. I sliced the apples super-thin with the mandoline, and dehydrated about 2 hours. 

After 2 hours, the apples were warm and soft, not fully dehydrated (which would have made them crispy or chewy). I tossed with agave and cinnamon, and quickly realized we would need more apples to cover the top of the cheesecake (I think that's because I used a 9" pan, while the original recipe used a 6" pan). So, I repeated with 2 more Honeycrisp apples. Then tossed all of the semi-dehydrated apples with about 2/3 cup of the dried cranberries, agave, cinnamon, and the reserved crust mixture, and voila! Cranberry-apple topping. Yum. Just place mixture on top of the cheesecake. When ready to serve, remove the springform.
Can you believe that this is a healthy, living food? It is gluten-free, dairy-free, and sugar free- but so sinfully rich, you would never know it.

(You know, I usually want pecan pie for Thanksgiving, but I just realized, I didn't even miss it!)

Here are some links to the health benefits of:

Monday, October 31, 2011

Boo! Gluten Free Halloween Crackers

I've decided crackers are even more fun to make than cookies :)
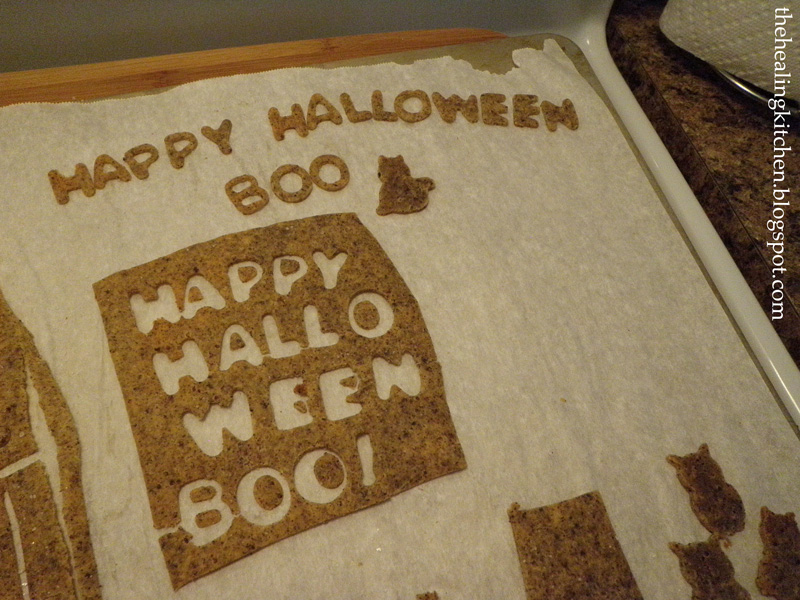
I used black quinoa in these crackers, hoping the crackers would be dark or black for a spooky Halloween look. That didn't happen, but you can see the black flecks in there:
Lesson learned: if you decide to make crackers that spell something (Happy Birthday? Merry Christmas? Happy New Year? Congratulations?) I recommend large cookie cutters. These were tiny and somewhat tedious to break out. Large cookie cutters are MUCH easier. These were fun, and cute, but I wouldn't do it again. Large letters. Trust me.

Here is what they look like before baking. I dug through my cookie cutters and also found cats and owls:

You bake the cookies just like that- slide the whole piece of parchment paper on the cookie tray and bake. Break out the crackers after they cool:
And the best part, you get to eat the scrap pieces from in between: 

Then surprise your little goblins:
Hope this gives you some fun gluten free ideas for future holidays/birthdays/parties. Simply use your favorite gluten free cracker recipe. There are a couple of gluten free cracker recipes on this blog, and you can Google for others. Crackers are SUPER easy to make!

Have a safe and Happy Halloween!

Thursday, October 27, 2011

Allergy-friendly Candy Apples

This recipe is linked to Wellness Weekends and Allergy-Friendly Fridays
Be sure to visit those pages for more yummy Halloween treats!

Hi everyone! I meant to post this recipe last week. I was traveling, and I thought I'd done well in planning ahead to write this post on the road. I made the apples early, took photos, loaded all of the photos onto my laptop, and edited photos while on the plane. Perfect! Now I just had to add the recipes and upload to the blog...
Guess what I forgot at home???

Yup. The recipes.

Oops!

But now I'm back, and here you go...

Here are recipes for THREE versions of candy apples. No gluten, corn, soy, dairy, or refined sugar. Bonus: they are RAW vegan! Yes, raw vegan treats for Fall : ) Who needs Halloween candy? These taste MUCH better- and they are better for you.

As I was thinking about writing this post, I came across some pre-made candy apples in Publix (our local grocery store).
Here are the ingredients: 
Obviously these are not an option for anyone with a corn allergy, or kids who may be sensitive to artificial flavors or dyes.

There were also caramel apples: 
Ingredients: 
Corn syrup, refined sugar, dairy PLUS sugar, soy, more dairy (can you really call dipotassium phosphate "milk"?), more soy, even MORE soy, something unpronounceable, imitation vanilla- really, there is not any FOOD in here, except for the apples. And it contains three of the eight major allergens.

How about the chocolate turtle apples?
Ingredients:
Yeah. More of the same. 

So, now that you are convinced you probably do not want to feed this commercial, pre-packaged "food-like substance" to your family... here is an easy & healthy alternative.
I started with the biggest, prettiest Fuji apples I could find. You can use any variety of apple you like.

Note: next time I would choose the smallest apples I can find, not the largest. I was dazzled by the beautiful large apples in the store. But as I was making the apples, they were really too big and heavy, and they were much too big to eat. Each of these apples was enough for 2-4 people. Too big. But they were pretty : ) 

A smaller apple would be easier to handle (especially for kids) and it would also give you a better candy-coating-to-apple ratio.

OK, on to the recipes. I experimented with caramel, chocolate, and white chocolate apples. 

I used the "I Am the Best" Caramel Sauce recipe from Cafe Gratitude's I am Grateful (un)cookbook

Raw Vegan Caramel Apples
Ingredients
Apples
Lollipop or popsicle sticks

Caramel
1 cup macadamia nuts
1/2 teaspoon himalayan salt
1/4 cup raw almond milk
1/2 cup raw agave nectar
1/4 teaspoon vanilla powder
1/2-1 teaspoon yacon syrup

Method
Place all ingredients apart from the yacon syrup in high speed blender. Pulse or start on low and gradually increase the speed until you have achieved a smooth texture (you may need to add a little more almond milk).

Now blend in 1/2 teaspoon yacon syrup, slowly. Taste and add a little more yacon syrup if you like. Note: if you add too much yacon syrup, the color will change from golden to green!

Note: I added about 2 Tbsp melted raw cacao butter to this recipe in the hope that it would harden on the apple once it cooled. It did not harden as I'd hoped, and I also thought it changed the taste (it was still good, but it was much better without). I did not try it, but I think adding 1 Tbsp coconut butter to the recipe might have the "hardening" effect I was going for. So you might try that if you are feeling adventuresome. If you try it, I'd love to hear how it works out.

Insert a popsicle or lollipop stick and dip apples in caramel:
Sit on plate or bowl. This is where I'd hoped it would harden, but it never did (it was still yummy though)
Some of the caramel slid off, and I wound up with a thin coating of caramel, something like this:
Roll apple in topping of your choice, if desired. I used a coconut and pecan mixture left over from another recipe:

Next up: Chocolate apples. The chocolate part of this recipe is from Sarma's Living Raw Food (un)cookbook.

Raw Vegan Chocolate Apples
Ingredients
Apples
Lollipop or popsicle sticks

Chocolate coating
1 1/4 cups coconut oil, warmed to liquify
3/4 cup plus 2 Tablespoons raw cacao powder
3 1/2 Tablespoons maple syrup
Pinch of sea salt

Blend all chocolate ingredients until smooth and fully emulsified.

Dip apples in chocolate. Roll in topping, if desired. I used chopped almonds. This topping will harden even faster if you put it in the fridge.


Last one: White chocolate apples!

White Chocolate Candy Apples
Ingredients
Apples
Lollipop or popsicle sticks

White Chocolate (recipe from Lisa at Vegan Culinary Crusade)
1/2 cup melted raw cacao butter (place it in a bowl of hot water until it becomes liquid)
1 tsp vanilla bean (extract or powder)
1/4 cup raw agave syrup (if you keep it in the fridge give it some time on the counter to warm up so it won't cause the cacao butter to solidify too quickly).

Method
Stir everything together in a bowl.
Dip apples in white chocolate coating. Let cool to harden. It is OK to put in fridge, but do not put in freezer. The white chocolate coating is ok in the freezer, but frozen apples thaw out to be mush.
Note: I did not try it, but I think adding 1Tbsp coconut oil to this recipe would make a nice smooth coating that hardens. Let me know if you try that and how it turns out!


Enjoy your healthy, allergy-friendly candy apples! 
I'd love to hear which one you choose, and how it turns out.